 Hello!
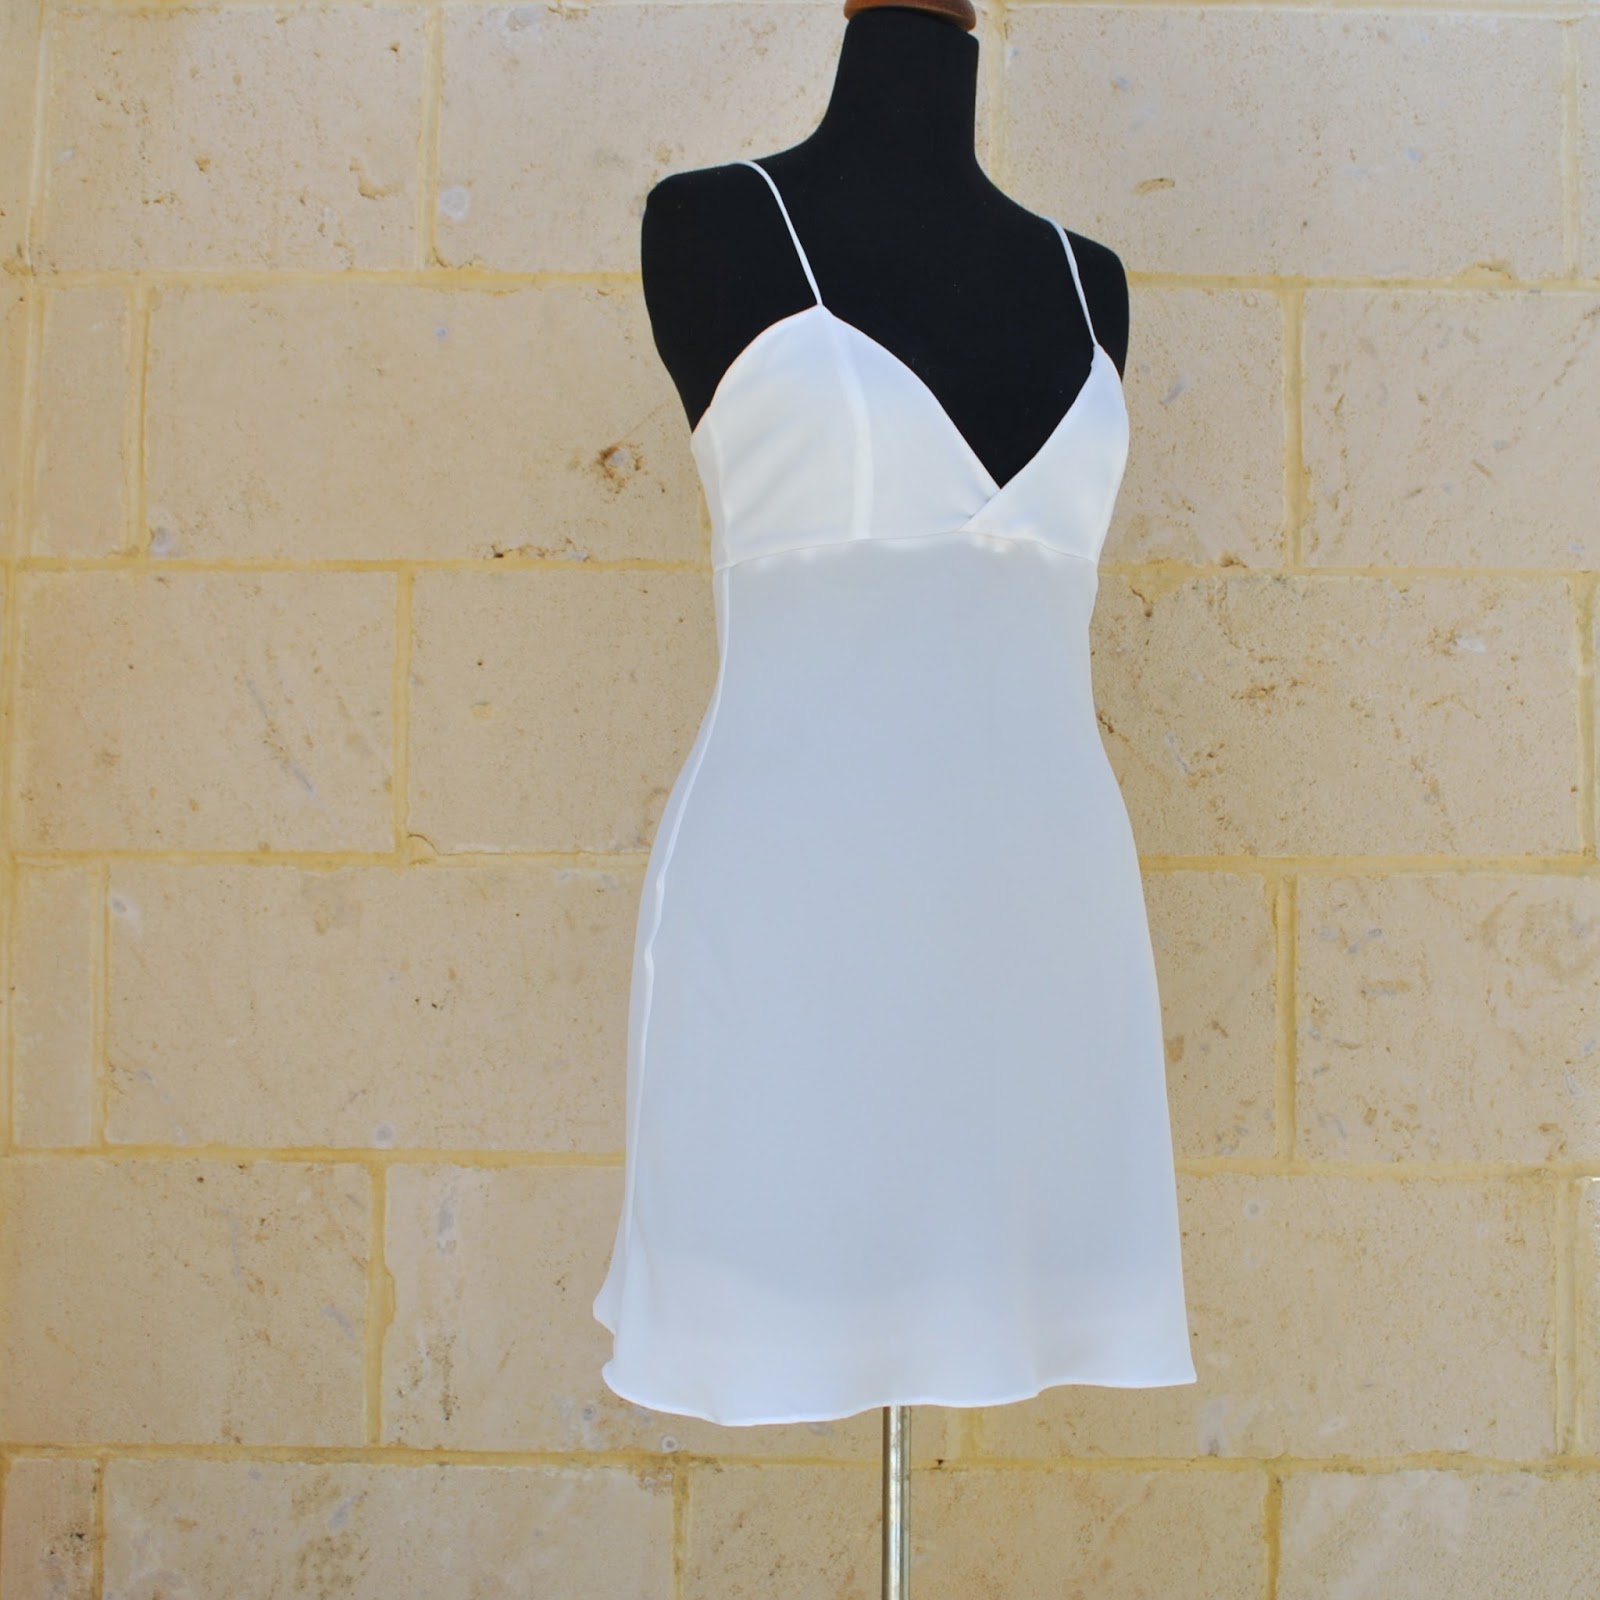
I’ve made a new slip; which looks superficially rather plain and boring, belying the hours of of care that has been lavished upon it, haha! Bias hemlines! aaaaugh! *insert Munchian scream here*
Pattern; the Ruby slip, designed by Sheryll of pattern scissors cloth. I downloaded it years ago but this is the first time I’ve used it! I’ve wanted to, but actually felt a little shy of doing so since she made her blog private for quite a long time. Anyhow, now she’s back … yay! and so I feel ok about using and linking to her pattern again. Thank you so much for the wonderful pattern, Sherry!
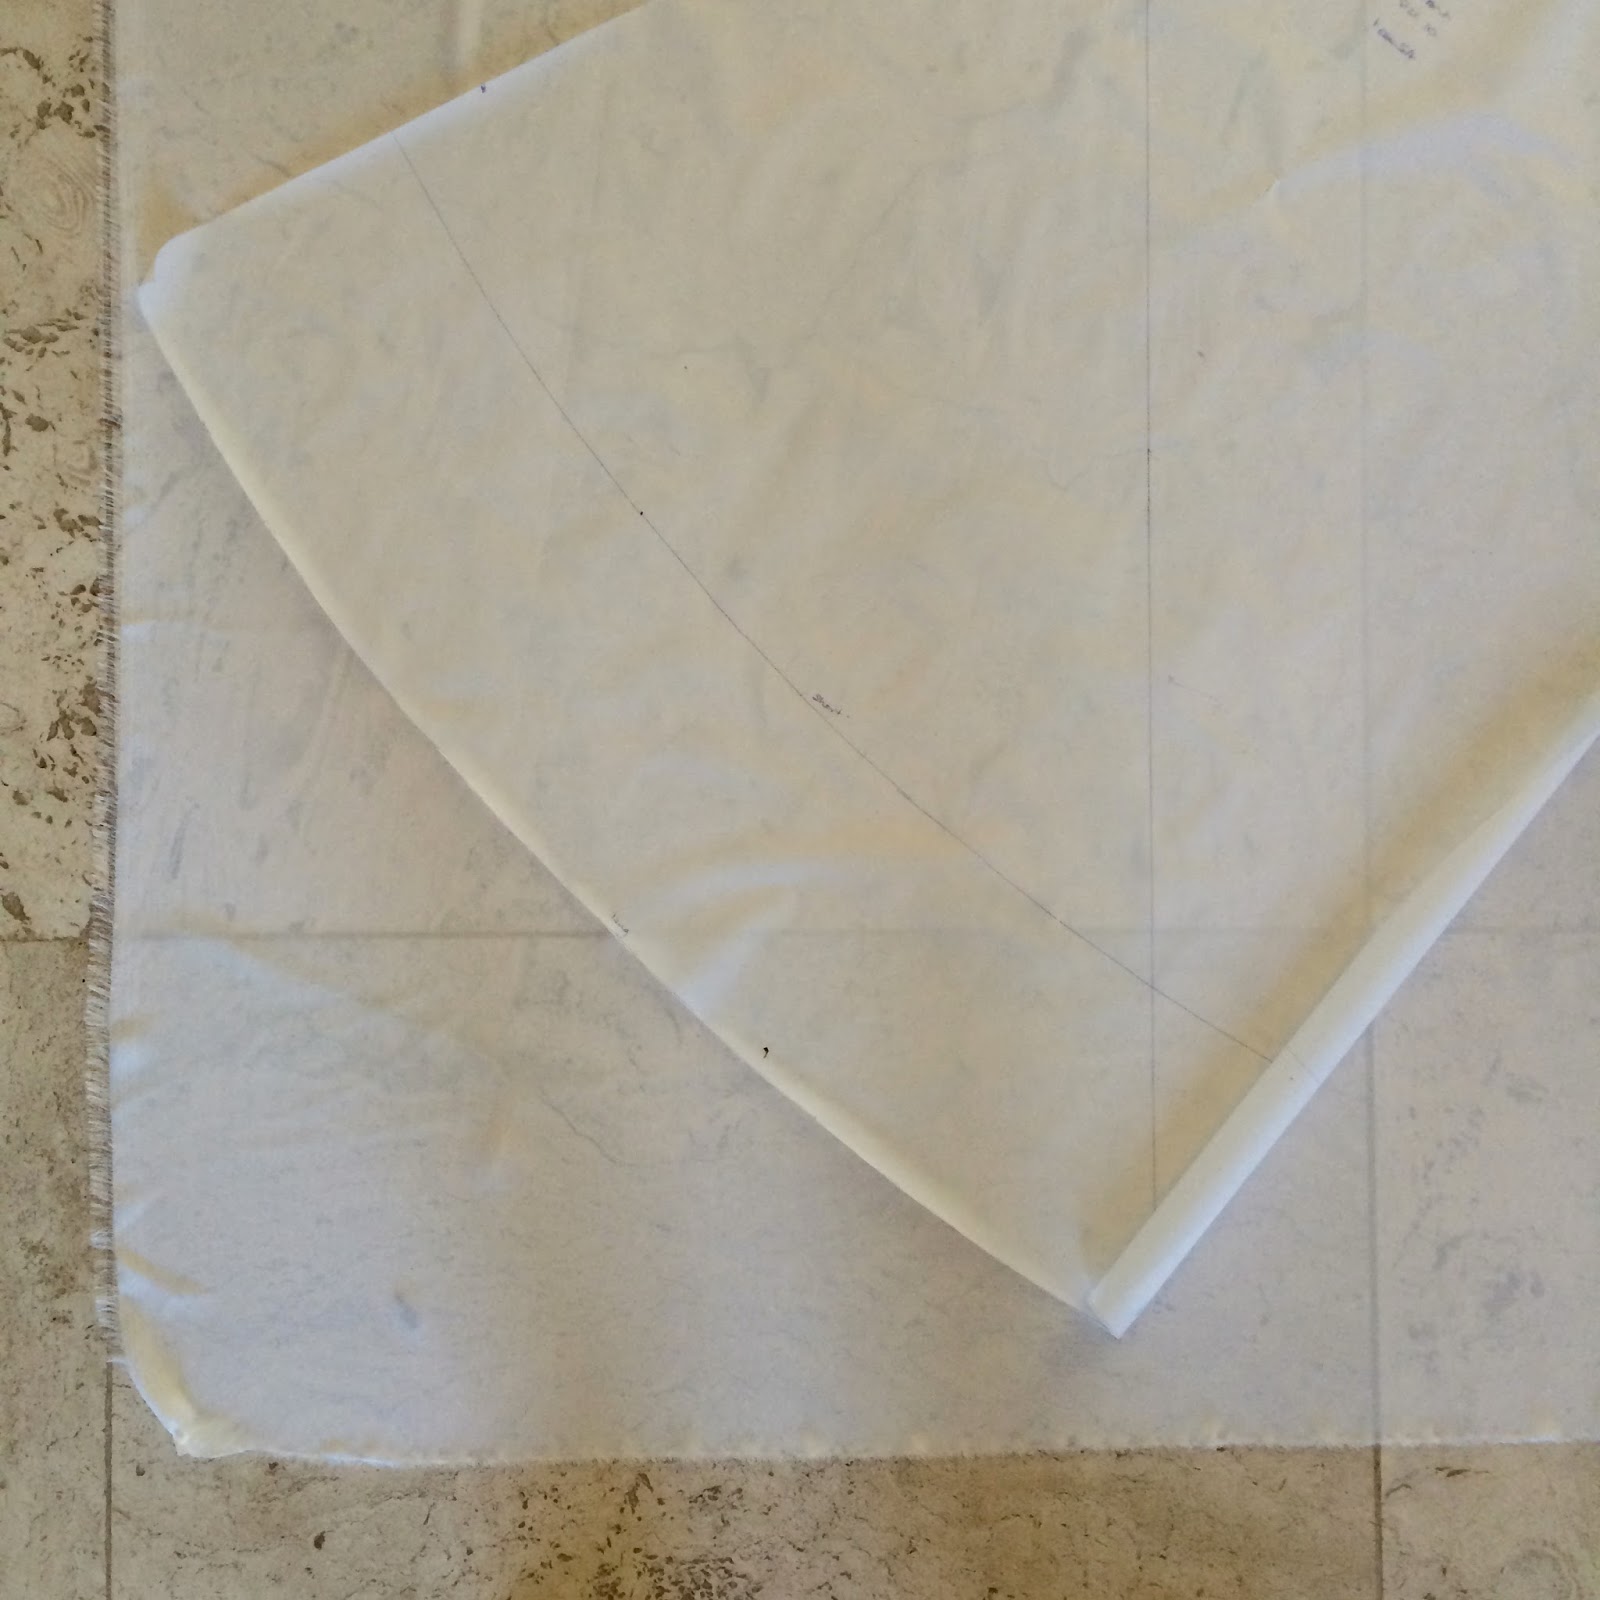
Fabric; a fine and slithery ivory crepe from FabulousFabrics. The slip is cut on the bias, so hurrah for large-scale floor tiles! I can’t say how many times I’ve found them super useful for lining up grain lines, selvedges, bias lines etc etc when laying and cutting out my pattern pieces. And especially when you’re dealing with a slippery slithery fabric like crepe, which is so dodgy it can deviate and deform at the slightest provocation.
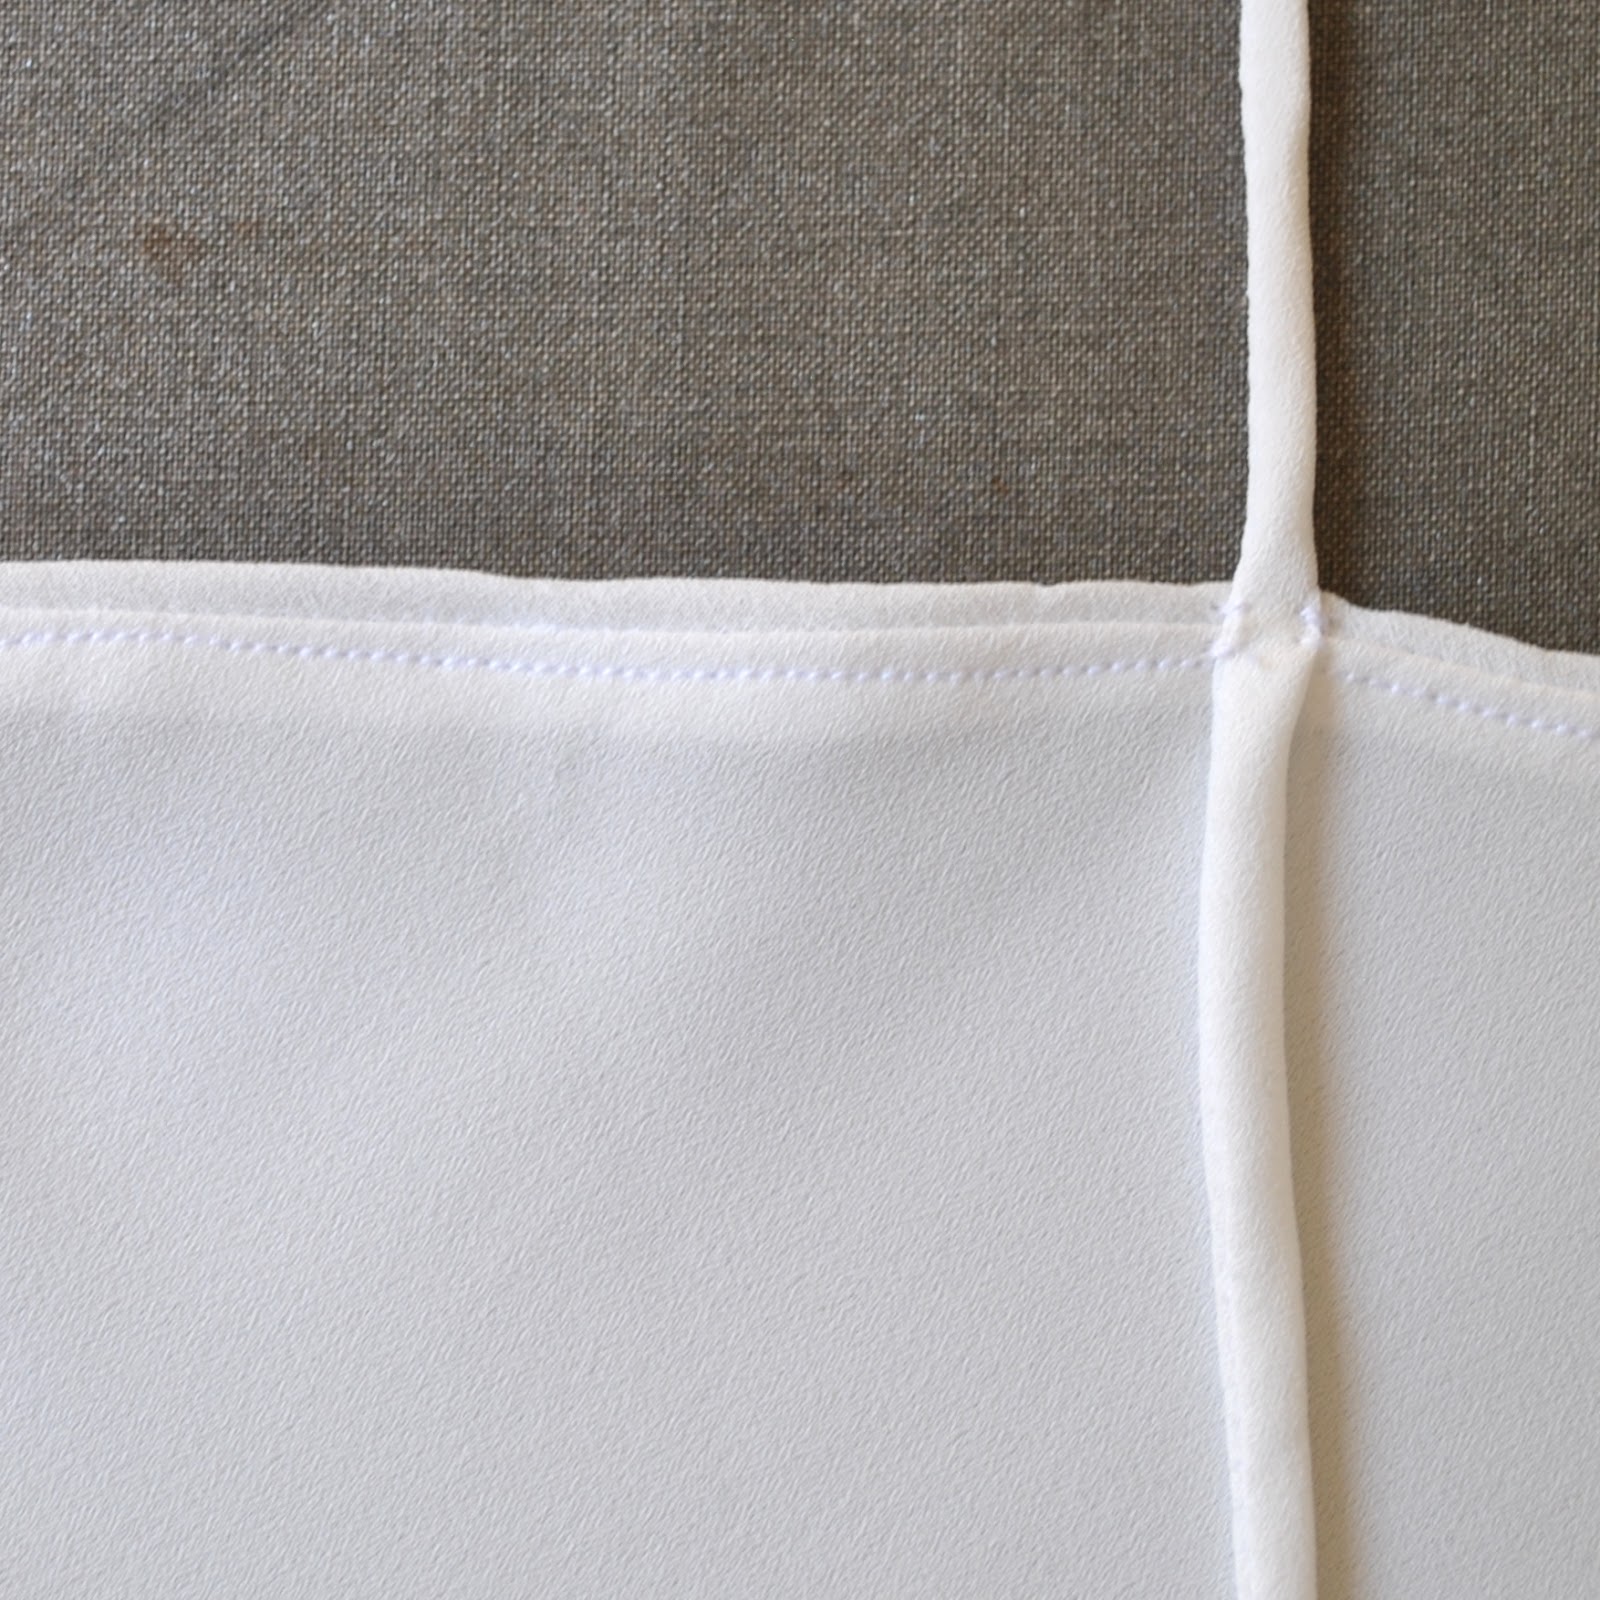
Sherry’s pattern is designed for a lace bodice but I cut my pieces all from the crepe, with a double layered bodice front and back. The skinny skinny spaghetti straps are encased within the two layers on the front bodice, whereas at the back (pictured below) I hand-tacked them inside the bodice, not within the two layers, to enable easy unpicking/readjustment in the case of the straps stretching out over time. The under stitching of the bodice lining is visible in this picture here too.
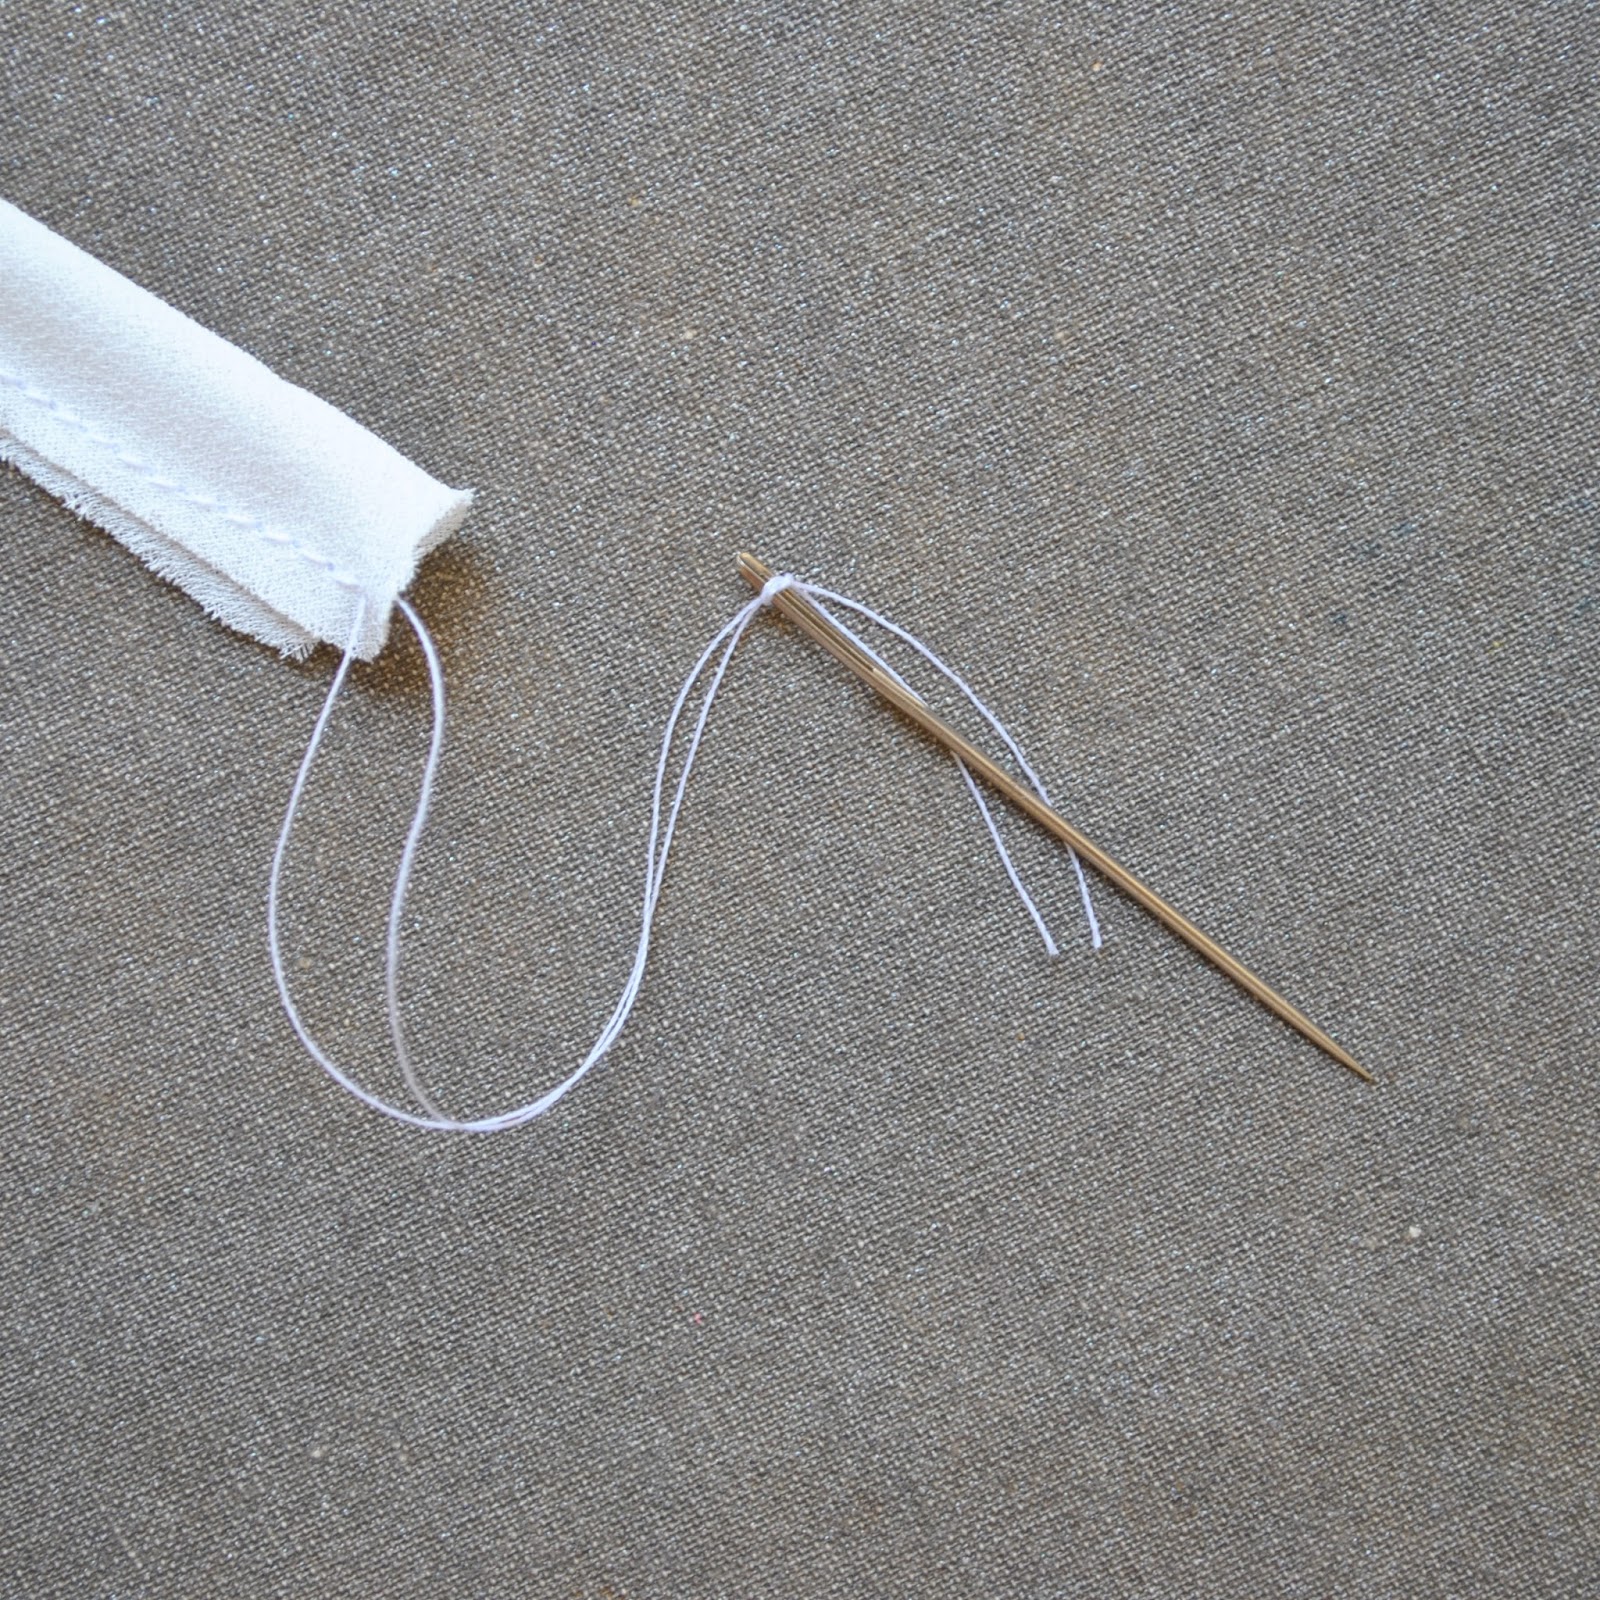
Those skinny straps, by the way; I know everyone probably has their own individual way of turning them; I tie the seam thread ends through the eye of a wool needle and let it drop/push it through through the tube, turning the tube out. A wool needle is generally quite blunt enough to use for this purpose and unlikely to get stuck in your fabric on the way, but if you’re worried about the point being a little too sharp you can always put it through eye first.
Also; cut your straps a few centimetres longer than required, so you can trim off the ends that invariably turn out a little scrappy-looking after turning.
I sewed all seams as French seams but just overlocked the bodice-to-dress seam on the inside to finish it *blush*
Picking my battles here…!
The slip then spent a week hanging up on Bessie to let that bias drop out as much as possible. Then I spent aaaaaages measuring and measuring and re-measuring and double checking that hemline, first on both Bessie then myself to be absolutely sure it’s straight, before cutting it to length.
The length is determined by the fact that this slip is tailor-made to go under another dress I’m in the process of making right now, by the way; but I do hope to wear it with other things too, of course 🙂
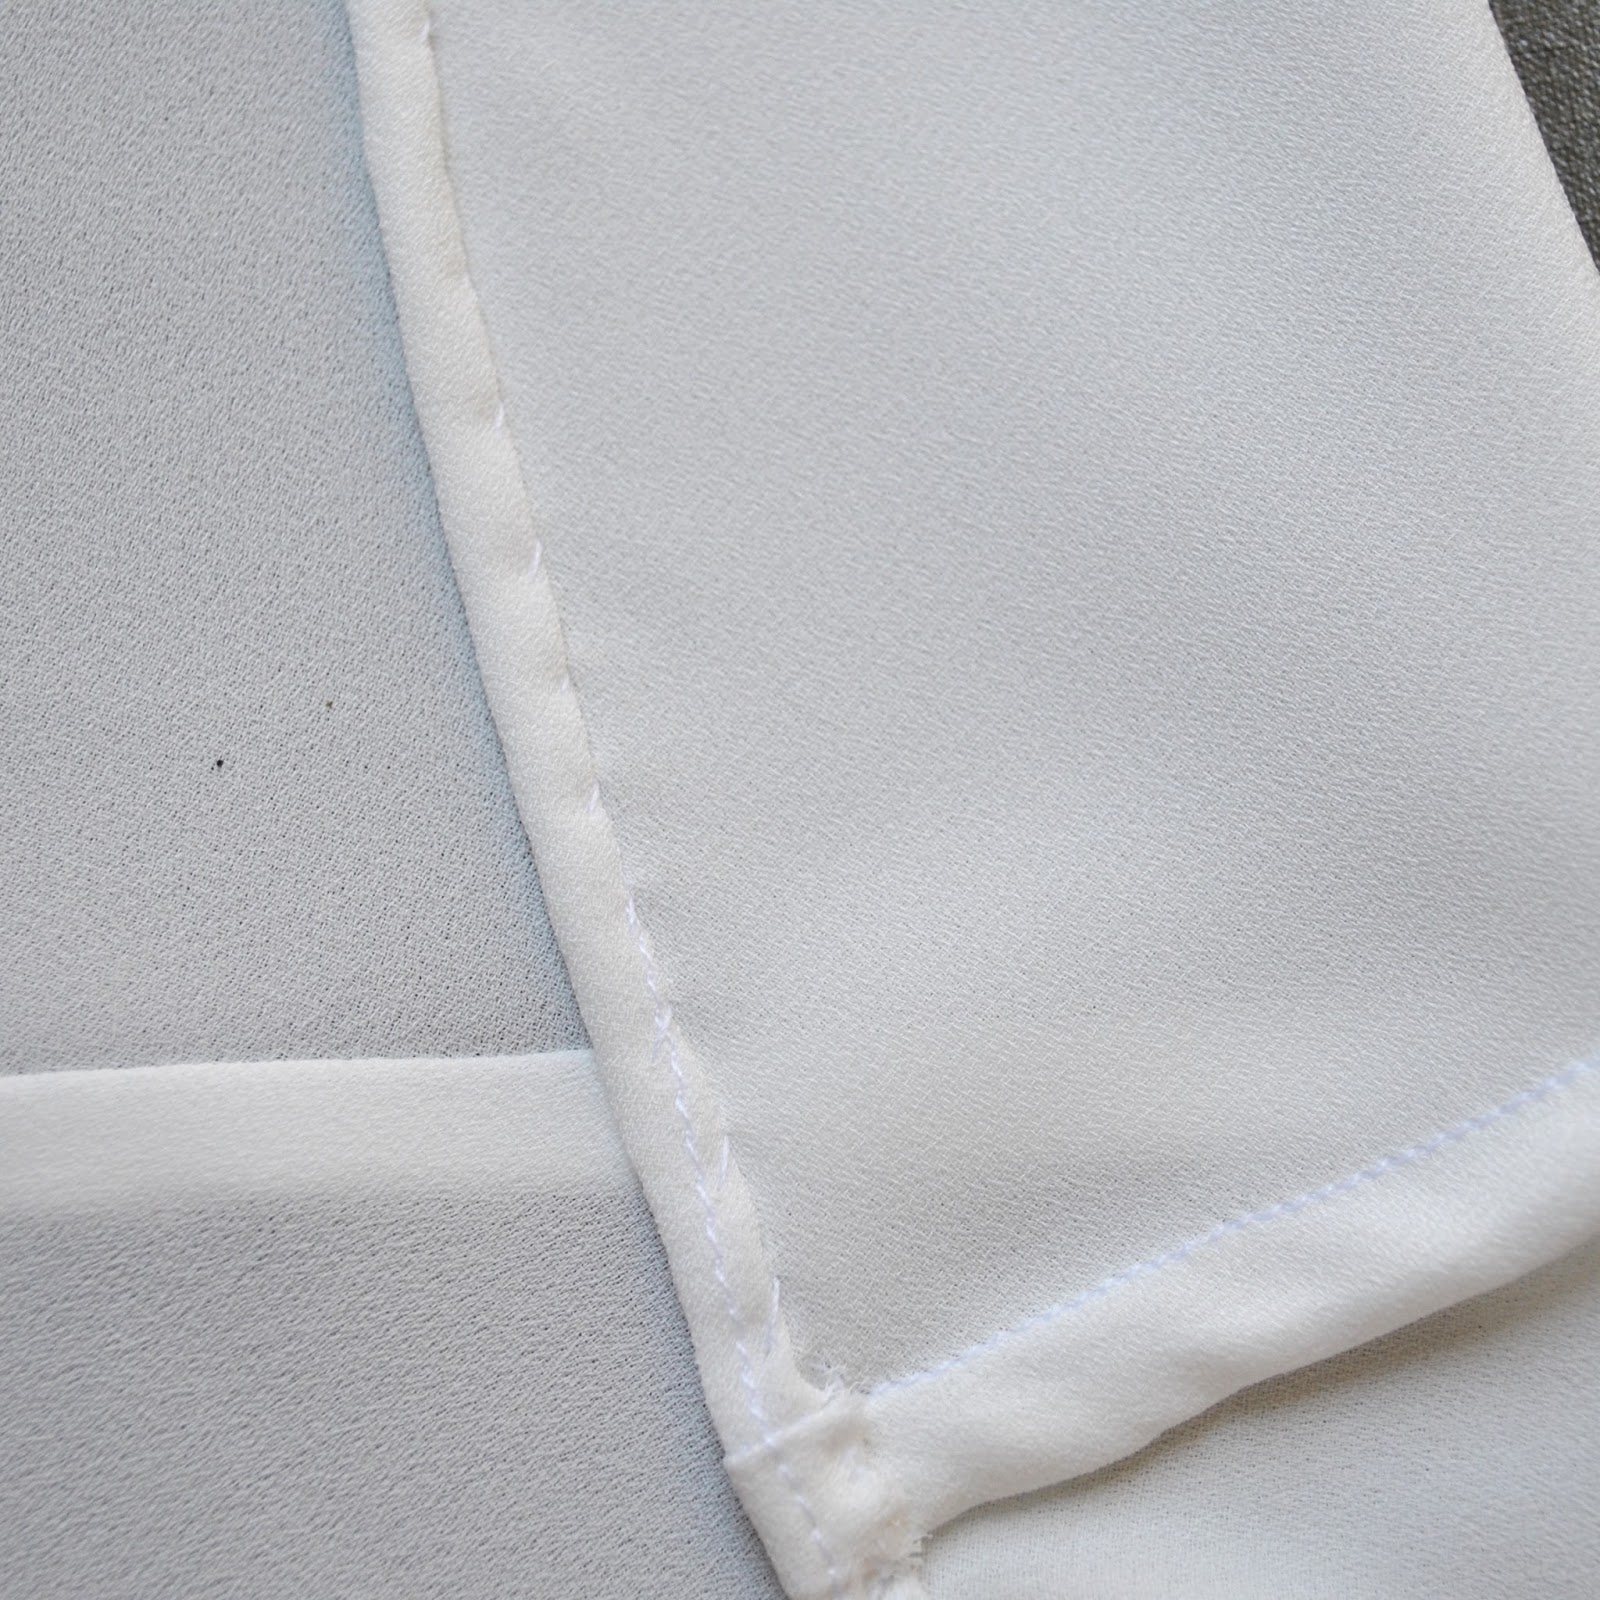
In the close-up above, at the very lower edge of the picture can be seen some white stay-stitching along that hem… if the fabric is very light and slithery like this, I generally stay-stitch a stitching guideline, situated a few millimetres outside the measured lower edge of a bias-cut garment, on the machine. Then I trim the seam allowance outside that, it gets rolled up and I stitch along and into that machine stitching when hemming. The benefits of this stay-stitching are threefold: it not only makes it a heckuvva lot easier to stitch a hand-rolled hem, it stabilises the fabric substantially and prevents the bias from stretching out too much while you’re stitching, the dreaded lettuce leaf edge! AND also keeps your hem on the straight and narrow as it were, keeping it even and helps avoid any little dips, ducks and dives in the final product. Even the best hand-roller is bound to roll a little bit more, a little bit less every now and again. Nit-picky; I know, but every little bit helps I think, and after all that careful measuring to ensure the hemline is perfectly even, it makes sense to safeguard it and keep it as straight as is humanly possible for the stitching of it too, yes?
Also as seen in the picture; I often don’t “roll” the French-seamed side seam under twice at the hem either, but turn it up just the once for its short bit of hemline… why? frequently it’s too bulky and often creates a little dip or worse, a “flip-out” of the hem at that point if I’ve tried to force it. Probably my bad sewing, but there it is, I get better results like this!
Later edit;
Jillian asked about turning spaghetti/rouleau straps; thank you Jillian! Fabrics like this slippery crepe are rarely a problem but in some thicker and/or stiffer fabrics, turning out a strap can be a bear. The less fluid the fabric the less easily it can be manipulated into turning inside out into a little tube… and yes that starting bit is always the most awkward bit!
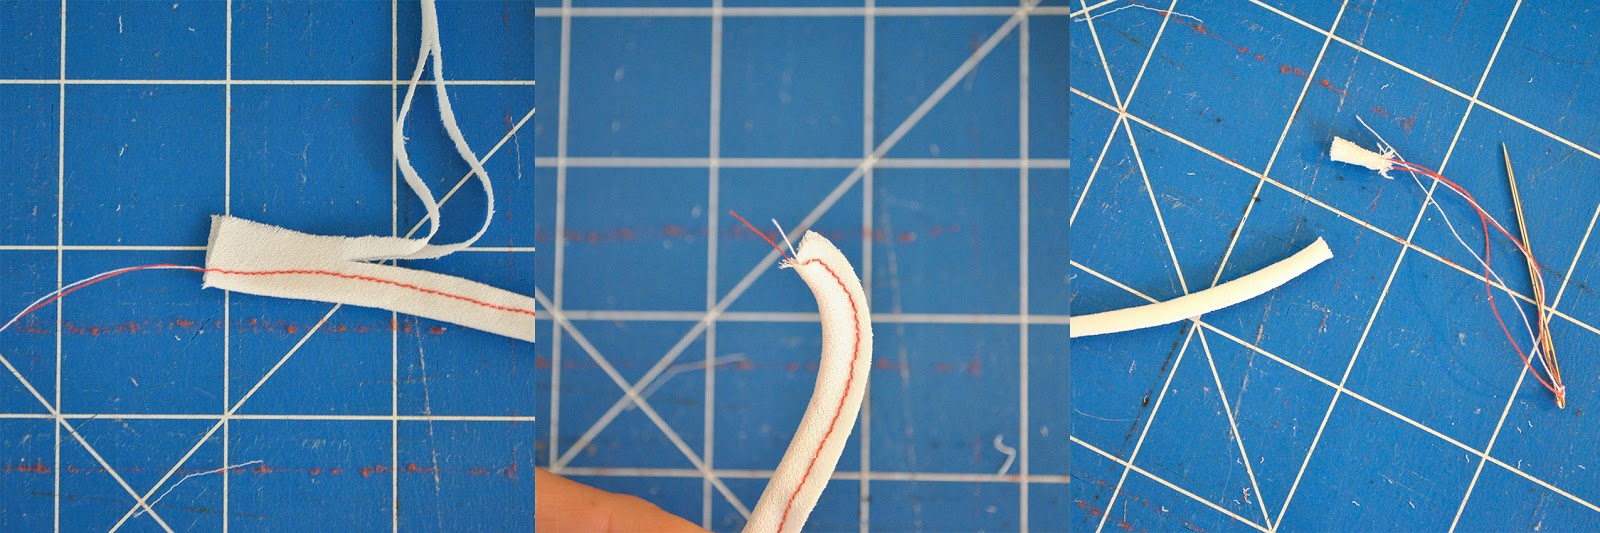
Firstly; it’s important to trim the seam allowances so as to be of a much smaller width/lesser thickness than the final tube will be.
Also, never never allow the fabric to bunch up excessively, but keep teasing the tube along, a little bit at a time, slowly but surely 🙂
Another little trick I have used successfully is to sew the end centimetre or so of the tube seam tapering inwards into a slightly skinnier tube at the very end, as pictured above left. The skinnier end does pull into and turn inside the wider “main” tube a little easier than if it was the same circumference. The tapered end bit can be trimmed off after the strap is turned out successfully.


It's beautiful, and I love simple "boring" projects like this because they're generally the ones that show off so much sewing skill
It's beautiful, and I love simple "boring" projects like this because they're generally the ones that show off so much sewing skill
This slip is just beautiful and so prettyly stitched up! Thank you a lot for your tutorials! 🙂
Beautiful sewing. It seems a shame that you will wear this covered up by something else.
Beautiful staple to add to your wardrobe – love this ivory colour!
Really gorgeous!
This is such a gorgeous slip it's almost a little sad it'll be worn under a dress and not 'shine' on its own!! Thank you so much for taking the time to write about your process and techniques. I've learned so much from you. 🙂
love the simplicity of it. could do with one myself.
+++++++++++++++++++++++++
Thanks for posting about this slip. I downloaded the pattern years ago but it got lost when the computer crashed. I'm so glad to have the chance to get it again!
Yours is absolutely perfectly beautiful.
Making a plain garment in fabric like this is not easy because every little thing you are not happy with shows. In patterned fabric, you can get away with a lot more. Looks lovely…
Re turning out spaghetti straps etc – have you tried the marvellous tool which Knitwit stocks? I always use that for turning out straps. Has a fancy mechanism at the end which latches onto the end of the spaghetti strap and then pulls through the unturned section. As usual a lovely garment idea from you – just love the simplicity and bias of this garment.
This looks so elegant. I love wearing slips and it is something that I have a difficult time finding in the stores. I have made a couple but need to make a point to make more for myself.
Beautiful slip and it will fell so gorgeous on. I have the FastTurn set and it works a dream for any straps that I need to turn.
Really beautiful and so delicate and neat! I really love your slip and I want it for myself!
OK rouleau drive me absolutely mental. I always see descriptions like yours that make it sounds so simple and I CAN NEVER EVER TURN THOSE THINGS RIGHT SIDE OUT. Ok, sorry for screaming. I can never get the start of the tube to start going inside. Any hints, oh lovely Carolyn. Pretty please? 🙂
Haha! it does me too sometimes Jillian! drive me mental, I mean! 😀 So I've added a little edit at the end there with my own habits for turning out a tube.. I hope this helps, and thank you for asking!
That is so pretty. I just imagine the screaming it took to finish it! The slippery fabric and the fact it's on a bias! Nicely done, as always! I like the tips about the turning that skinny tube, and the machine stitching at the hem – thanks!
I always say the simplest looking items are the hardest to finish to perfection – and you've done a marvellous job of this Carolyn! Double points for those bias french seams too! Your tip for turning the hem at the seam is one I'll remember, as it is easy to get an unsightly bump there.
PS: I thought my wooden floorboards were the bomb for laying out fabric – but floor tiles are even better!
floor tiles
What a beautiful slip and your workmanship is impeccable. Lovely!
Your work is always impeccable even when it comes to a slip! Lovely Carolyn!
Looks so simple and elegant. I will remember the trick with the tile edges for getting your grainline straight. Thank you.
It took today's post to remind me of this post. Full slips/chemises are so feminine and just the thing under certain dresses.
I just downloaded the pattern and like you I will be making it without lace. I have silk, but it gets incredibly static-y on me, so I am going with Bemberg rayon. I am also going to make slightly wider straps that cross in the back as I have a shoulder joint that can't have anything like a strap riding on it. Plus, I think crossed straps will look cool.
One day I will get around to making a bra with the slip attached for sweater dresses, but that is ways off. I still have yet to make even a single bra…
This is lovely in its simplicity. Do you ever do a rolled hem on your overlocker on a woven hem like this? I've only ever done it once on a knit….
thanks Fabric Tragic! I do use the rolled hem sometimes; it does make for a very quick and tidy finish. You could use it for this project and I would definitely recommend the stay-stitching so as to avoid stretching out the bias-cut lower edge too much 🙂
Pingback: coral floral with bells on it | Handmade by Carolyn
Pingback: village dress, for Cassie - Handmade by Carolyn
Pingback: gathered pocket; a tutorial - Handmade by Carolyn
Pingback: acton dress, in the folds - Handmade by Carolyn
Pingback: Japanese linen-gauze shirt dress - Handmade by Carolyn
Beautiful slip Caroline! I’ve been thinking about making myself a nice silk slip too – there is nothing like a fine quality slip to wear under a dress! I remember my grandmother (from Liverpool UK) had one beautiful slip that she wore all the time (she was born in 1898 and I saw this said slip in the ’50’s) – no where near as elegant as yours – more like a tank top that just kept going – but it did the job beautifully 🙂